open_AR_Sandbox
Welcome to the Open_AR_Sandbox repository. If you do not know what this is all about, have a look at this video:
:warning: Warning! It is unfortunate that we have to state this here, but: downloading the software and presenting it somewhere as your own work is serious scientific fraud! And if you develop content further, then please push these developments back to this repostory - in the very interest of scientific development (and also a requirement of the license). For more details, please consult the information below and the license.
![]()
![]()
Table of Contents
- Introduction
- Features
- License, use and attributions
- Requirements
- Installation
- Download sample data
- External packages
- Project Development
- Interested in obtaining a fully operational system?
Introduction
Augmented Reality Sandboxes are a great tool for science outreach and teaching due to their intuitive and interaction-enhancing operation. Recently AR Sandboxes are becoming increasingly popular as interactive exhibition pieces, teaching aids and toys.
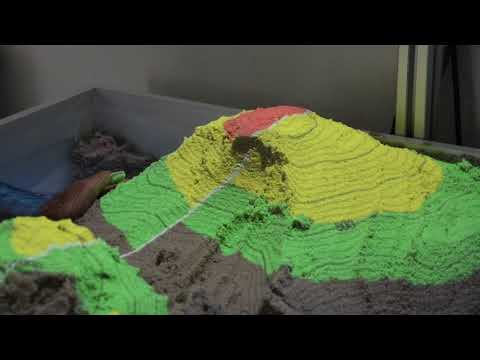
AR Sandboxes consist of a box of sand that can be freely sculpted by hand. The topography of the sand is constantly scanned with a depth camera and a computed image is projected back onto the sand surface, augmenting the sandbox with digital information.
However, most of these common AR Sandboxes are limited to the visualization of topography with contour lines and colors, as well as water simulations on the digital terrain surface. The potential for AR Sandboxes for geoscience education , and especially for teaching struc- tural geology, remains largely untapped.
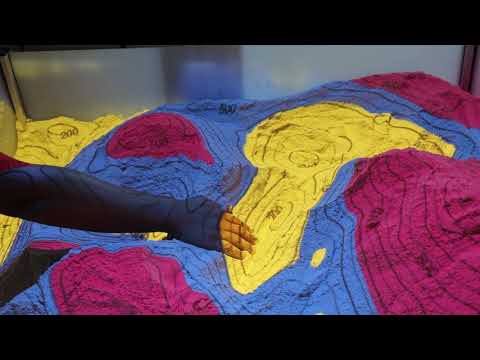
For this reason, we have developed open-AR-Sandbox, an augmented reality sandbox designed specifically for the use in geoscience education. In addition to the visualization of topography it can display geologic subsurface information such as the outcropping lithology, creating a dynamic and interactive geological map. The relations of subsurface structures, topography and outcrop can be explored in a playful and comprehensible way.
Features
- compatible with most AR Sandbox builds
- subroutine for calibration and alignment of depth image, sand surface and projection
- versatile model creation with the powerful GemPy library
- open-source under LGPL v3.0 license
- fully customizable color map, contours and fault line visualization
- We recently added computer vision algorithms to the sandbox that open up a whole new field of possibilities! By placing printed markers into the sandbox, thew user can trigger actions or define points, lines and areas in the sandbox without using the computer
Some of the modules already implemented include:
- MarkerDetection: Place virtual boreholes in the model, Define a cross section with multiple markers, Set the start position for simulations (landslides, earthquakes, etc.) check the arucos marker detection for more information (https://docs.opencv.org/trunk/d5/dae/tutorial_aruco_detection.html)
- TopoModule: Normalize the depth image to display a topography map with fully customizable contour lines and variable heights.
- SearchMethodsModule: Takes the depth image and performs Monte-Carlo simulation algorithms to construct the probability distribution based on the structure of the current DEM in an interactive way. (https://chi-feng.github.io/mcmc-demo/app.html)
- GemPyModule: Use the full advantage of the powerful GemPy package to construct geological models and visualize them on the sandbox in real-time
- GradientModule: Takes the gradient information from the depth image and highlight slopes in x and y direction, calculation of laplacian, interactive hill shading, visualization of a vector field, and streamline plot.
- LoadSaveTopoModule: Takes the depth image and allows it to be saved as a DEM to reconstruct topographies previously constructed.
- LandslideSimulation: With precomputed landslides simulations, recreate a topography and trigger a landslide to visualize its flow, direction, and velocity in real-time, or frame by frame.
- PrototypingModule: Create your own module with the help of this module to link the live threading of the sandbox with your ideas
- LandscapeModule: Landscape generations using machine learning codes powered by CycleGAN
- SeismicModule: module for seismic wave modelling in the sandbox. This uses the power of Devito
- GeoelectricsModule: module for visualization of geoelectrical fields using aruco markers as electrodes. This use power of PyGimli
Check the video below for some of the features in action:
The open_AR_Sandbox as well as GemPy are under continuous development and including more modules for major outreach. Some of the features we are currently working on include:
- More Tutorials, examples, Tests and Documentation to help you develop your own modules
- GemPy optimization for (much!) higher framerates
- on-the-fly modification of the geological model (layer dip, thickness fault throw, etc.)
- Integration of more depth sensors (support to all kinect sensors)
- Improve compatibility with Linux and MacOS
- …
License, use and attribution
Feel free to download and use the Open_AR_Sandbox software! We do not provide any warranty and any guarantee for the use. We also do not provide professional support, but we aim to answer questions posted as Issues on the github page as quickly as possible.
Open_AR_Sandbox is published under an GNU Lesser General Public License v3.0, which means that you are free to use it, if you do not do any modifications, in a wide variety of ways (even commercially). However, if you plan to modify and redistribute the code, you also have to make it available under the same license!
Also, if you do any modifications, especially for scientific and educational use, then please provide them back to the main project in the form of a pull request, as common practice in the open-source community. If you have questions on the procedure, feel free to contact us about it.
These are the main conditions for using this library:
- License and copyright notice
- Disclose source
- State changes
- Same license (library)
For more details on the licsense, please see provided license file.
If you use Open-AR-Sandbox in a scientific abstract or publication, please include appropriate recognition of the original work. For the time being, please cite:
Virgo, S., De La Varga Hormazabal, M., & Wellmann, F. (2019). Open-AR-Sandbox: An open-source Augmented Reality platform for geoscience. In Geophysical Research Abstracts (Vol. 21).
Requirements
You will need:
- Microsoft Kinect (we tested the first and second generation kinect with a usb adapter, but every kinect compatible with the pykinect drivers will likely work).
- Projector
- A box of Sand
Mount the kinect and projector facing down vertically in the center above of the box. The optimal distance will depend
on the size of your sandbox and the optics of the projector, from our experience a distance of 150 cm is well suited
for a 80 cm x 100 cm box.
More details on how to set up the kinect and projector can be found in the 1_calib_projector.ipynb
and 2_calib_sensor.ipynb notebooks, and if you want to use the ArUco markers 3_calib_arucos.ipynb.
Installation
First of all you will need a healthy Python 3 environment. We recommend using
Anaconda. In addition to some standard Python packages, you will need a
specific setup dependent on the Kinect version you are using. In the following we provide detailed installation
instructions.
Now download or clone this repository open_AR_Sandbox from github.
- First clone the repository:
git clone https://github.com/cgre-aachen/open_AR_Sandbox.git - Create a new anaconda environment
conda create -n sandbox-env python=3.7 - Now when you want to use the sandbox and the packages we are about to installl you will have to activate the
environment before starting anything
conda activate sandbox-envStandard packages
To install all the standard packages please use the requirements.txt file:
pip install -r requirements.txt
You can also have a local installation of the sandbox by using the File “setup.py” by doing:
pip install -e .
Kinect Installation
For Windows
Kinect v1 - Future
There is still no support for kinect V1…
Kinect V2 - PyKinect2
(Tested on Windows 10). First, install the current Kinect SDK including drivers. You can use the software bundle to test the connection to your kinect, before you continue.
To make Python and the Kinect SDK communicate, install the related PyKinect2 wrappers which can be easily installed via:
pip install pykinect2
Unfortunately, the configuration of PyKinect2 needs to be adjusted to work on a 64 bit System. Therefore, edit the Lib/site-packages/pykinect2/PyKinectV2.py file, go to line 2216 and comment it:
# assert sizeof(tagSTATSTG) == 72, sizeof(tagSTATSTG)
Add the following lines below:
import numpy.distutils.system_info as sysinfo
required_size = 64 + sysinfo.platform_bits / 4
assert sizeof(tagSTATSTG) == required_size, sizeof(tagSTATSTG)
For Linux
Kinect v1 - libfreenect
To make open_AR_Sandbox talk to the first generation kinect you will need the Libfreenect Drivers with Python Wrappers. The installation is kind of straight forward for Linux and MacOS but challenging for Microsoft (in fact: if you pull it off, let us know how you did it!) The steps can be summarized as follows (refer to any problems regarding installation in to link) To build libfreenect, you’ll need
- libusb >= 1.0.18 (Windows needs >= 1.0.22)
- CMake >= 3.12.4 (you can visit this page for detailed instructions for the installation)
Once these are installed we can follow the next commands
sudo apt-get install git cmake build-essential libusb-1.0-0-dev
sudo apt-get install freeglut3-dev libxmu-dev libxi-dev
git clone https://github.com/OpenKinect/libfreenect
cd libfreenect
mkdir build
cd build
cmake -L .. # -L lists all the project options
cmake .. -DBUILD_PYTHON3=ON
make


cd ../wrappers/python
python setup.py install
# now you can see if the installation worked running an example
python demo_cv2_async.py
Kinect v2 - freenect2
or pylibfreenect2
For this we are going to use a python interface for the library
libfreenect2
called freenect2.
- First we need to install the freenect2 as described in the installation
guide.
The steps can be summarized as follows (refer to any problems regarding installation in to
link)
git clone https://github.com/OpenKinect/libfreenect2.git
cd libfreenect2
sudo apt-get install build-essential cmake pkg-config sudo apt-get install libusb-1.0-0-dev libturbojpeg0-dev libglfw3-dev - With all the dependencies installed now we can make and install
mkdir build && cd build cmake .. -DENABLE_CXX11=ON -DENABLE_OPENCL=ON -DENABLE_OPENGL=ON -DBUILD_OPENNI2_DRIVER=ON -DCMAKE_INSTALL_PREFIX=$HOME/freenect2 -DCMAKE_VERBOSE_MAKEFILE=ON make make install - Set up udev rules for device access:
sudo cp ../platform/linux/udev/90-kinect2.rules /etc/udev/rules.d/Now unplug and replug the Kinect sensor.
- Test if the kinect is correctly installed, by running:
./bin/Protonect -
You should be able to see the kinect image working. If not, check libfreenect2 installation guide for more detailed instructions of installation
- If everything is working until now, we can install the python wrapper. For this first we need to indicate where the
freenect2folder can be found.export PKG_CONFIG_PATH=$HOME/freenect2/lib/pkgconfigNOTE: if you installed the
freenect2in other location, specify variables with the corresponding path - now we can use
pip install, or any other method described in the freenect2 installation guide.pip install freenect2IMPORTANT: To this point will work in any python that starts with the terminal. Nevertheless, if we start python from another source, the error
ImportError: libfreenect2.so.0.2: cannot open shared object file: No such file or directorywill appear every time we import the package. To fix this problem we will need to export the variables again or if you want a more permanent solution, open the.bashrcfile and paste the following at the end of the file:# set PATH to freenect2 to be imported in python export PKG_CONFIG_PATH=$HOME/freenect2/lib/pkgconfig - With this it will always work for any python open from the terminal. Including jupyter notebooks
- But now if we want to run this package in Pycharm or symilar, we can directly copy the 3 files
(
libfreenect2.2.s0...) from thefreenect2/libfolder into thelibfolder of your environment. Ej: - if you are using an anaconda environment, open the folder:
<your_path>/anaconda3/envs/<sandbox-env>/lib
- And in this folder paste the previous copied files (3 files!!!). Keep in mind that you need to replace the <…> with your specific path.
- If you dont want the manual work then run directly (remember to change the paths according to your needs):
sudo cp $HOME/freenect2/lib/libfreenect2{.so,.so.0.2,.so.0.2.0} $HOME/anaconda3/envs/sandbox-env/lib/
LiDAR L515 Installation
Installing in Windows
First, go to the latest release page on GitHub and download and execute the file:
Follow the instructions for the installation and update the Firmware of your sensor.  You should be able to use and see the depth and RGB image.

#### Installing in Linux

Detailed installation steps can be found in the
[linux installation guide](https://github.com/IntelRealSense/librealsense/blob/development/doc/distribution_linux.md).
The steps are as follows:

- Register the server's public key:
`sudo apt-key adv --keyserver keys.gnupg.net --recv-key F6E65AC044F831AC80A06380C8B3A55A6F3EFCDE || sudo apt-key adv --keyserver hkp://keyserver.ubuntu.com:80 --recv-key F6E65AC044F831AC80A06380C8B3A55A6F3EFCDE`
In case the public key still cannot be retrieved, check and specify proxy settings: `export http_proxy="http://<proxy>:<port>"`
, and rerun the command. See additional methods in the following [link](https://unix.stackexchange.com/questions/361213/unable-to-add-gpg-key-with-apt-key-behind-a-proxy).

- Add the server to the list of repositories:
  Ubuntu 16 LTS:
`sudo add-apt-repository "deb https://librealsense.intel.com/Debian/apt-repo xenial main" -u`
  Ubuntu 18 LTS:
`sudo add-apt-repository "deb https://librealsense.intel.com/Debian/apt-repo bionic main" -u`
  Ubuntu 20 LTS:
`sudo add-apt-repository "deb https://librealsense.intel.com/Debian/apt-repo focal main" -u`

- Install the libraries:
  `sudo apt-get install librealsense2-dkms`
  `sudo apt-get install librealsense2-utils`

Reconnect the Intel RealSense depth camera and run: `realsense-viewer` to verify the installation.

#### Running with python

After the sensor is installed on your pltaform, the Python wrapper can be easily installed via:

```pip install pyrealsense2```

If any problems with the installation reference to
[Intel RealSense Python Installation](https://github.com/IntelRealSense/librealsense/tree/master/wrappers/python#installation)

Download sample data
-------

You have the option to download some publicly shared files from our open_AR_Sandbox shared folder.
You will need to do this if you want to run the tests, use the landslides simulations and/or get the trained models for
the the use of the Landscape generation module.

In the terminal type:
python3 sandbox/utils/download_sample_datasets.py
and follow the instruction on the terminal to download the specific files you need. We use
[Pooch](https://github.com/fatiando/pooch) to help us fetch our data files and store them locally in your computer
to their respective folders. Running this code a second time will not trigger a download since the file already exists.

External Packages
---------
### GemPy

To use implicit geological models inside the sandbox, go to [GemPy](https://github.com/cgre-aachen/gempy),
clone or download the repository and follow the Gempy Installation instructions. With gempy installed
you can follow the tutorial [GempyModule](notebooks/tutorials/04_GempyModule/).
pip install gempy
If using windows you will need to install `Theano` separately as instructed in [here](https://www.gempy.org/installation)
conda install mingw libpython m2w64-toolchain conda install theano pip install theano –force-reinstall
### Devito

This package uses the power of [Devito](https://github.com/devitocodes/devito) to run wave proppagation simmulations.
More about this can be found in `notebooks/tutorials/10_SeismicModule/`. Follow the Devito installation instructions.
* This module so far have only support in linux
pip install –user git+https://github.com/devitocodes/devito.git
### PyGimli
This library is a powerful tool for Geophysical inversion and Modelling. Some examples can be found in
`notebooks/tutorials/11_Geophysics/`.
[PyGimli](https://www.pygimli.org/) can be installed following the installation intructions
[here](https://www.pygimli.org/installation.html)

We recomend creating a new environment where PyGimli is already installed and over that one install the sandbox
dependencies.
conda create -n sandbox-env -c gimli -c conda-forge pygimli=1.1.0
* And now go back to [installation](/open_AR_Sandbox/README.md#installation) and follow all over again the instruction but skipping
step 2.

### PyTorch

To use the LandscapeGeneration module we need to install [PyTorch](https://pytorch.org/). This module use the power
of [CycleGAN](https://github.com/junyanz/pytorch-CycleGAN-and-pix2pix)
to take a topography from the sandbox, translate this as a DEM and then display it again on the sandbox as a Landscape
image.
To install the dependencies for this module do:
#For Windows pip install torch===1.6.0 torchvision===0.7.0 -f https://download.pytorch.org/whl/torch_stable.html
#For Linux pip install torch torchvision
git clone https://github.com/junyanz/pytorch-CycleGAN-and-pix2pix
cd pytorch-CycleGAN-and-pix2pix
pip install -r requirements.txt
```
Once this is installed, copy the trained model in /notebooks/tutorials/09_LandscapeGeneration/checkpoints folder,
and then follow the notebook.
Get in contact with us to provide you with the train model for this module.
Project Development
Open-AR-Sandbox is developed at the research unit Computational Geoscience and Reservoir Engineering (CGRE) at RWTH Aachen University, Germany.
Project Lead
Maintainers (also external to CGRE)
- Daniel Escallón
- Simon Virgo
- Miguel de la Varga
Obtaining a full system
If you are interested in buying a fully operating set-up including appropriate hardware, pre-installed software, and set-up and maintenance, please contact Terranigma Solutions GmbH.